For most of the people how want to learn how to surf waves, the turning point in the learning curve is standing up and staying on top of the surfboard for a few seconds (did you know that sandiegosurflesson.com guarantee you to do that in one surf lesson?). That is the moment that I consider addictive, but also, a big challenge. There is not a correct time to do it. It all depends on how easy you can learn and we know that this is somewhat personal. So don’t feel bad if your friend is doing better than you, everything has a right time to happen, keep focused and never give up.
Below there is a list of first steps to be taken in order to stay on top of the surfboard:
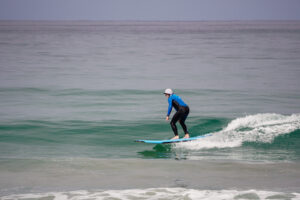
1st Make sure what is your proper stance.
One of the most important surfing basics for beginners to learn is the proper surfing stance. Since surfers ride with their body facing to the side, there are two different stances possible: a regular stance puts the left foot at the front of the board, while a goofy stance puts the right foot at the front. But how to know it?
Use a surprise shove from behind. Tell a friend that you want her to come up behind you in a few minutes and surprise you with a gentle shove. Your friend should pay attention to which foot you step forward with. The foot that you stick forward to catch yourself should be in the front when you ride. Or, If you skateboard or snow, the stance you use for these sports is almost always the same one that will naturally suit you when surfing.
2nd – Look for surfing classes with certificated coaches.
This is very important, because surfing coaches are prepared to make things easier. They know exactly what you need to learn, step by step. This can be pricier than trying to learn by yourself, but will save you a lot of time and maybe some bruises.
3rd – Practice on the beach.
You can draw an imaginary surfboard with a stick in the sand;make sure it has the same size and width of the surfboard you are going to try to learn on. Once you have it drawn, lay over it, belly down, your face pointing to the nose of the board and check where your feet are. The correct placement is with your toes slightly out of the tail of the board.
Adjust your body and simulate paddling to catch a wave, after 6 or 8 strokes put both hands at the edges of the board and stand up, both feet and the same time, in a single and quick movement.
4th – Feet positioning and bending knees.
Step 3 needs to be done several times, until you are sure you’ve got the step up movement figured out. Now it’s time to pay attention how your feet are positioned over your board. The need to be well separated, wider than your shoulder. Back foot must be at the end, close to the tail, 10 to 20 inches ahead of it, depending on the size of the board. Your knees are important as well. They need to be slightly bended, this will give you much more balance, because your center of gravity is lowered by doing it.
5th – Open arms and shoulders.
Last, but not less important is to pay attention to your arms and shoulders. You must maintain them opened, not too wide, but never keep arms close to the body. Your arms will keep you balanced, it like when you are walking over a very narrow platform or a slackline. The movements of shoulders and arms can either help you to stay on top of the board longer or just make you fall really quick. The most important thing is to point your front arm to the place you want to turn your board. The front arm is the direction one and the back arm is the balance of it and will always follow the movement.
6th – After practicing enough on the beach it is time to hit the water.
Choose places where there are some broken waves, on the inside or even some small reform waves. Broken waves are those all white, pretty much only foam. Reform waves are those that had already broken on the outside and end up losing power and reform, breaking up again, much smaller, on the inside. Pay attention to rip currents, rocks and other hazards that may be dangerous.
After you figured out the field you are playing with, then wait for a good ripple and paddle, the same way you just did on the beach. Wait until you feel the wave is pushing you and that you are ahead of it, then it is time to stand up. Repeat the movements done on the beach earlier. This will be harder, because there is movement, lots of energy, things you did not have while playing on the sand. This will require you a lot of patience and repetition. Repeat, over and over again. There will be times you are not even get on your feet, but then there will be that magical moment, when you could stand up and ride the wave for 2 or 3 seconds. Trust me, things get better, the more you practice, the easier it gets.
As you practice, you are going to fell the need to start to ride the walls of the waves; and here is the best part of surfing. Riding the walls means you are on the power source of the wave. Some waves are long and slow and will offer you some fun rides. They seem sometimes to be endless. There is time to pay even more attention to your arms and knees, never force a movement, try to move gently. Strong move can ruin your ride as you are not prepared yet for quick turns. And remember, always point your forward arm point to where you want yout surfboard to go, then let shoulders and the rest of your body follow it.
7th – Knowing how to fall.
Doesn’t matter for how long you’ve been doing it, falls will always happen and here is in important tip about it. You better know how to fall. Avoid your board, this is the most crucial thing to think about when falling. It is better if you are on a soft-top surfboard, but it still can hurt you. So if you feel like you are going to fall, jump sideways, protect your head with your arms around and try to kick the board away from you, to the opposite side. Know, after you get the theory, please put all in practice. Look for a surfing school close to where you live and have fun.
Stay safe guys. See you in the water.